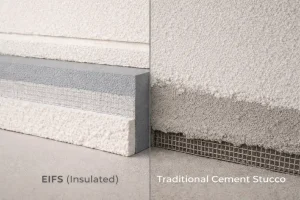
Traditional brick stucco is a cement-based plaster used inside and outside buildings to cover walls and other surfaces. It is made of cement, sand, and lime, and once it sets, it is strong and doesn’t need much upkeep.
Stucco is easy to clean and keeps energy costs down. It also doesn’t burn or rot, which makes your home more valuable. Please take care of your stucco walls early on and fix any holes that show up over time.
HOW TO REPAIR STUCCO?
Caulk can fix cracks less than 1/3 to 1/4 of an inch wide. Most caulk for repairing cracks in stucco is made of rubber resin and is flexible enough to stretch and keep the damage from getting bigger.
Even though plaster is one of the most lasting wall coverings, it can get cracks and holes from settling and bumps over time. It’s essential to fix any significant holes or cracks in the cement as soon as they appear to stop further damage.
These significant outside cement holes are difficult to repair. The correct tools and sufficient time are required. You may not have done as excellent of a job as a plaster repairman. But you may always contact a stucco repair near me company to do the task.
We’ll look at a couple of techniques in this article that you may use to repair large holes in stucco.
STEP 1:
Bring any equipment necessary to repair the stucco hole. It’s necessary to use a dust mask, gloves, and safety glasses.
STEP 2:
The first step is to clean up the space. Corners. Use a cold chisel and ball-peen hammer to remove the loose stucco from the hole, then blow away the dust.
STEP 3:
The uninjured stucco around the patch area should have the old metal lath removed. Pulling the lath back will make it more comfortable to deal with.
STEP 4:
Seal off the outside border of the lath using the rubber membrane. The region being sealed off could not effectively adhere to the rubber membrane. Make a temporary patch or secure it with a few staples.
You may use a tube of polyurethane sealer, which is less expensive and has previously been used by builders for this purpose, in lieu of rubber membrane, which is very expensive for this usage.
STEP 5:
It will help if you cut a piece of double-D tar paper. Cut it to suit the exposed portion of the route. Use a hammer and nail to fasten the work to the sheathing.
STEP 6:
Prepare and aluminize your Portland cement. Apply laminate on the mesh wire inserted into the hole and leave it for no more than ten (10) minutes.
STEP 7:
Then, apply it to the applied stuffing using a clean dash brush wet in Portland cement. When running, the cement will sink dramatically if you go too fast. Do not dash the laminate repeatedly since this will be subtle as well.
STEP 8:
Decorate it with a trowel and pattycake-style designs, then let it dry. Repaint the wall as it dries.
Larger cracks, chipped areas, and other problems must be fixed using the stucco patch compound. Before applying this material, clean the region of any loose components and then cut V-grooves into the sidewalls of the crack.
repair larger cracks, or gap with a masonry float or trowel after mixing the patching compound per the instructions on the bottle. Before letting the mixture dry, sand the repaired area using a scoop.
When the compound has dried, you may hide the repair by adding a second coat of stucco patch, matching the texture, and imitating the textural pattern using a comb or trowel.
FINAL THOUGHTS
In time, stucco may develop cracks and holes due to settling and impact damage. It’s crucial to choose a reliable stucco repair service nearby.